Sunday 15 July 2012

It's all about OWL / Это всё о СОВЕ

Some owl pictures and DIY lessons from Internet / Немного картинок и МК найденных в интернете


1. DIY hair grip with Owl / Заколка для волос с Совой


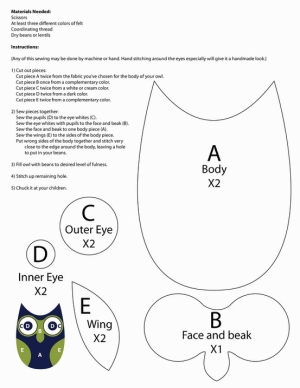
2. Owl Pattern / Выкройка Совы


3. Heart Owl Pattern / Выкройка Совы с сердечками


4. Pillow For needles / Игольница


5. Owl Pattern / Bыкройка для совы


6.  Some OWLS ideas From Fabric / Немного идей из ткани


7. Some OWLS ideas From Fabric / Немного идей из ткани


8. "Owl" invitation-card / Приглашение или открытка "Сова"


9. Wool + zippers= OWL / Шерсть+молния=Сова


10. Wristband ideas / Идея для браслета


11.  Some owl accesories / Немного украшений


12. Need to have this one / Необходимо приобрести такую


 13. Coffe coffe / И напоследок немного кофе! =)


Thank You for attention / Спасибо за внимание


Friday 13 July 2012

DIY Long summer dress/ Длинное платье на лето

Long summer dress made only from piece of light material and elastic / Длинное летнее платье сшитое всего лишь из куска лёгкого материала и резинки


Materials / Материалы:

  • fabric / материал
  • pair of scissors / ножницы
  • sawing machine / швейная машинка
  • pins / булавки
  • elastic / резинка
  • thread / нитки

Measurements / Мерки:

  • measurement of the breast / обхват груди
  • measurement under the breast / обхват под грудью
  • measurement above the breast / обхват над грудью


А.


В.


В1.


1. Take the lenght of  dress as You like. I took to the floor /  Взять длину платья которая Вам нравится. У меня длина в пол.

2. The width of the dress is breast measurement + 20 centimetres / Ширина платья равна обхвату груди + 20 см.

3. It will be 2 different pieces of elastic. The lenght of elastic You should measure on your body, to bend one piece of elastic under the breast and the second piece of elastic above the breast,it should be comfortable feeling / У Вас будет 2 части резинки разной длины. Длину резинки надо определить уже на теле, надо натянуть резинку над грудью и вторую часть под грудью.

4. As shown on the picture В or B1 You also will need  to do the "pocket" for the elastic under the breast / Так же как показано на рисунке B и В1 понадобится длинный кусок материала чтобы сделать "карман" для резинки под грудью.

5. Then You do the top ot the dress with the elastic, as shown on the picture A and under the breast with elastic. Do the bottom of the dress and dress is ready / Потом надо сделать вверх платья с резинкой как показано на рисунке А и потом вдеть резинку под грудью. Обработать низ платья и оно готово.


Photo by Alexandr Vik

And this dress is ready / И вот готовое платье


Thursday 12 July 2012

DIY Shorts and Lace/Шорты и кружево

Decor shorts with lace, easy like 1,2 and 3 / Декорирование шорт с кружевом, легко и быстро как 1,2 и 3


DIY from Zippers/Сделано из молний

My DIY from Zippers / Сделай Сам из Молний

I. Black Zip-Flower brooch / Брошь Чёрный цветок


Materials / Материалы:

  • long zipper / длинная молния
  • pair of scissors / ножницы
  • thread / нитка
  • needle / иголка
  • glue (hot glue) / клей
  • fastener for brooche (our flower) / застёжка для брошки
  • basis for brooche (piece of thick material) / основа для брошки


1. Cut from the long zipper / Вырезать из молнии:

  • 1 piece of zipper for flower center (lenght 10 centimeters) / 1 часть для центра цветка (10 см)
  • 8 pieces of zipper for outer petals (lenght 8 centimeters) / 8 частей для внешних лепестков (8 см каждый лепесток)
  • 4 pieces of ziper for inner petals (lenght 5 centimeters) / 4 частей для внутренних лепестков (5 см каждый лепесток)
2. Glue the center of flower together with glue as shown in the picture / Склеить центр цветок как показано на рисунке

3. Glue the outer and inner petals with glue as shown in the picture. It should be 8 pieces of outer big petals and 4 pieces of inner littel petals /  Склеить внешние и внутренние лепестки как показано на рисунке. Должно получиться 8 больших лепестков и 4 маленьких лепестка.


4. Glue the first layer of outer petals to the material basis. The first layer consist from 4 big petals / Приклеить первый слой лепестков к основе. Первый слой состоит из 4 больших лепестков.

5. Then gluet the second layer of outer patels. The second layer consist from 4 big petals / Затем приклеить второй слой из внешних  лепестков. Второй слой состоит из 4 больших лепестков.

6. The third layer consist from 4 little inner petals / Третий слой будет состоять из 4 маленьких внешних лепестков.

7. The last layer will be the center of flower /  Последний слой это центр цветка.


 8. Glue the fastener in the back side to the thick material / Приклеить застёжку к задней стороне цветка к основе из материала.


II. Pink Zip-Flower brooch / Брошь Розовый цветок


III. Rose zip flower brooch / Брошка Розочки


IV. Blue zip necklace / Синее колье


V. Zip earrings / Серёжки из молний


VI. Yellow zip- flower brooch / Жёлтая брошь цветок


Hair Style/Волосы,стиль

A few hair style that like, want to try/Некоторые стильные штучки с волосами

And every morning like that/И каждое утро в бой
Vinage hair style/Винтажная укладка волос


Cute,nice & simple/Мило,красиво и просто


Wedding one/Вариант для свадьбы

DIY


Summer Spirit/Летнее Настроение

Summer Spirit Clothes/Летнее настроение в одежде